|
|
||||
| ||||
Main Menu |
||||||||
|
|
||||||||
Contact |
||||||||
|
|
||||||||
Using IrfanView to Batch Convert (RESIZE) Images
If you do not have a copy of IrfanView, it can be downloaded from www.IrfanView.com and then installed on your computer.
NOTE: For a SIZE Comparison example page, Click HERE
- OPEN [run] IrfanView
- Navigate to Batch Conversion:
Click File -> Batch Conversion/Rename - This brings up the Batch Conversion window in IrfanView
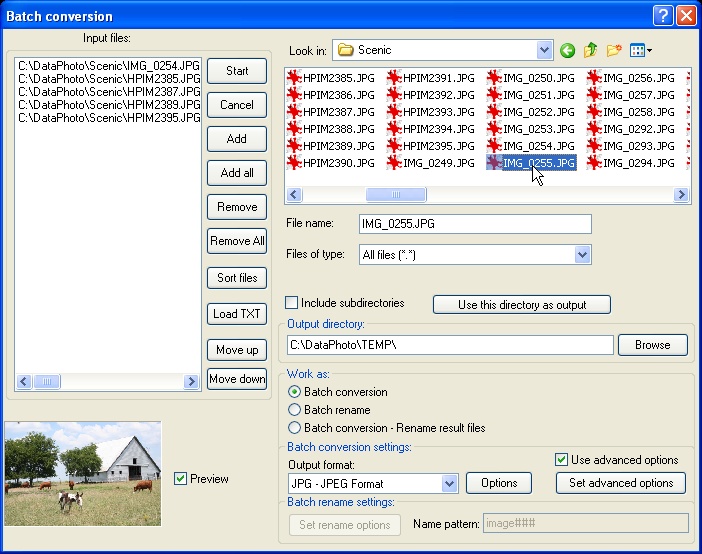
- Set up the INPUT and OUTPUT folder locations
- On the Look In file box – navigate to the file folder where t e pictures to be converted are located
- Click select the ones you want to convert
- Either click individual pictures
- Or click ADD ALL – or other …
- On the Output Directory file box – BROWSE to the directory where you want to put the converted pictures -
NOTE: if you are changing the extension – such as JPEG to GIF or something – they can go in the same directory – if you are converting JPEG to JPEG, for example, you will have to create/select another directory [or do a concurrent batch rename]. I like to click the ‘use this directory as output’ button to get me into the right ‘area’ of the files – then select the actual folder. - You CAN use a RENAME option (either ‘Batch Rename’ or ‘Batch Conversion – Rename Result files’) – which is powerful and requires more options for the RENAME function – this can be very handy – and will allow you to use the same directory. I don’t use the RENAME function for a number of reasons – but it can work fine. I just don’t want to deal with it. IrfanView will NOT allow you to over-write your original images UNLESS you have the “Overwrite existing files” option checked in the ‘MISCELLANEOUS’ section of the ‘Set for all images’ (Advanced Options) window. [talked about below] I would be VERY CAREFUL of this option – and suggest you NOT have it checked. Its default setting is not checked. This is good.
- So – in other words - for most purposes – without rename – CHECK the ‘Batch Conversion’ radio under the ‘Work as’ pane.
- Set Output Format
- Use the ‘Output Format‘ drop-menu selection combo to select the output format you want to use
- I suggest JPEG – but there are a LOT of selections available – including BMP, GIF and many more.
- Click the Options button next to the Output Format drop-menu
- This brings up the JPEG/GIF Save Options window –
- Set the ‘Save Quality’ - I suggest setting the bar to about 90% - more of less is ok –
- You don’t need to check any of the check-boxes – unless you see one that applies or you want
- Click OK – this will close the JPEG/GIF Save Options window and you’re back in the Batch Conversion window.
- Set the Advanced Options
- Click the Advanced Options button
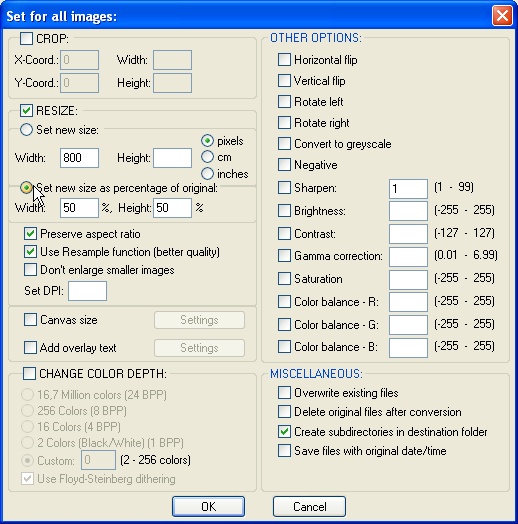
- This brings up the Set for all Images window
- Starting from the TOP LEFT:
- Do NOT check CROP (unless you want to crop)
- DO check ‘RESIZE’ box
- Check EITHER the ‘Set new size’ OR the ‘Set new size as percentage of original’ radio button
- If you select ‘Set new size’ radio: (pick a size ) [CLICK HERE to See size comparisons]
- 1000 pixels is very large
- 800 pixels is fairly large – I use that size often – the gallery enlargements on www.WhitesboroHomes.com are 800 pixel.
- 200 to 250 pixels is a small picture or a large thumbnail
- 50 to 100 pixels is about a thumbnail size.
- If you select ‘Set new size as percentage of original’ radio:
- select a ‘width’ (no need to select height if you use ‘preserve aspect ratio’ option
NOTE: you can go to the web and right-click on any JPG IMAGE – then click ‘Properties’ and it will tell you the dimensions of the picture – this is handy for helping you determine the size (in pixels) of the picture to which you want to convert.
- Select ‘preserve aspect ratio’ option – otherwise, the picture will appear distorted – either squashed or stretched
- Select ‘Use resample function (better quality) option – this can be very important – but is best just to check it.
- NO OTHER OPTIONS need to be checked – unless you see something you know you want to do.
- Click OK button – this returns you to the Batch Conversion window.
- Convert the Files - Click the START button on the Batch Conversion window – all selected files will be processed and resized and put into the folder you selected.
That’s it – it seems complicated, but is not really once you get into it.
| Home | Software Development | Web Development | Web Process | Experience | Web Site Links |
| Support Area |
Copyright ©DayComSolutions.com 2005-2012 All Rights Reserved |