|
|
||||
| ||||
Main Menu |
||||||||
|
|
||||||||
Contact |
||||||||
|
|
||||||||
Creating Custom Ringtones for the iPhone from Selections in your iTunes LIbrary
To create custom ringtones using iTunes:
Open iTunes - Right click on the song from whkch you are going to make into ringtone and select “Get Info.”
Go to the Options tab of the 'Get Info' dialog window and go down to the “Start Time” and “Stop Time” check boxes. Check both boxes and input the time you want your ringer to start/stop. The ringer has to be 30 seconds or less. If you want the ringtone to start from the beginning of the selection, you do not need to check 'Start Time' - it will then start at 0:0 - or the very beginning. Click OK when you’re done.
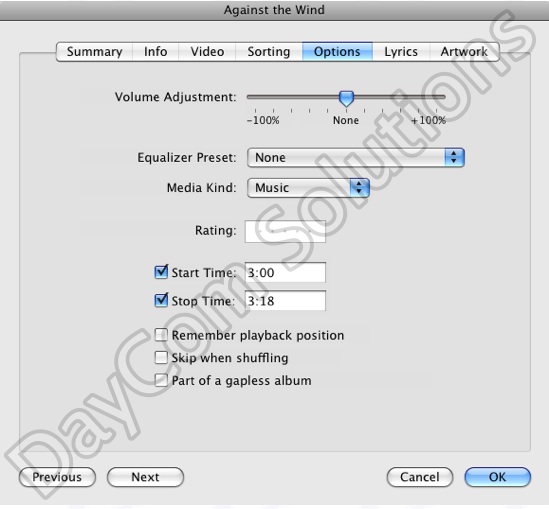
Next, right click on the song you selected (which now will be 'clipped' by the settings you entered for 'Start Time" and "Stop Time") and select “Create AAC Version”. The song will be re-encoded using the Start and Stop times just set. (In the above example, the new 'clipped' file will START at 3:00 minutes into the selected file and END at 3:18 - totaling 18 secons.)

NOTE 1: If your menu item does not read “Convert Selection to AAC” and reads “Convert Slection to MP3″ (or some other format) please go to iTunes > Preferences > Advanced > Importing and change the “Import Using” drop down menu to “AAC Encoder”.
NOTE 2: You will notice there is also a "Create Ringtone" menu selection. This will ONLY work with music purchased from iTunes - and then only for a period of time after purchase - the capability will expire after some period of time.
After iTunes has completed encoding/creating the new item that will become your ringtone, you will notice there are TWO selections in iTunes with the same name. The orginial should have a longer TIME than your newly created 'clipped' version. Drag the newly created 'clipped' (short) version to your desktop.
Next, Delete the newly created 'clipped' version in you iTunes Music Library - this will not delete the copy on your desktop, it will only remove the copy in iTunes. (If you do not deleted the 'clipped' version, it will not got into the Ringtone list when you double click it - it will just play like a selection.)
While you are in iTunes, right click on the orignial song you used to create the 'clipped' version, select "Get Info" and UNCHECK the START and STOP times. Otherwise, the next time the song plays from your iTunes library it will be 'clipped' in accordance with the Start and Stop settings.
Go back the song on your desktop and right click on your song and chose “Get info.” Go to the name and extension section and change the extension from .m4a to .m4r - OR, you can just change the extension right from your desktop by clicking slowly to get to the edit name mode and change the name. You will get a warning dialog, just confirm that you do want to use the .m4r extension.
After the extension is changed simply double click on the file to add it to your iTunes library under the ringtones section. Make sure you have 'Ringtones' selected in iPhones when you double click the selection.
The next time you Sync your phone with iTunes the new Ringtone(s) you created will be available on your iPhone in the "Custom" section when you navigate to Settings -> Sounds -> Ringtones.
NOTES:
The .m4r file is a renamed .m4a file that iTunes and the iPhone recognizes as a Ringtone. The .m4a file format is a part of MPEG-4. AAC isan improved version of MP3.
For more info, see: http://en.wikipedia.org/wiki/MPEG-4_Part_14 (for M4A) and http://en.wikipedia.org/wiki/Advanced_Audio_Coding (for AAC encoding)
| Support Area |
Copyright ©DayComSolutions.com 2005-2012 All Rights Reserved |